This is the third and final part to my incense burning series in which I will show you the tools I use to burn my loose incense. I pretty much went over the many uses and different types of incense available as well as the different types of herbs and incense I use to burn. Before getting into burning loose incense there are a few simple tools you will need. There are also some safety precautions you should take before getting started as well.
1. Make sure to never touch the charcoal directly once it’s lit. Always pay attention! Never leave your burner unattended.
2. Always place your burner on a heat-resistant surface, such as a trivet or ceramic tile. Depending on what method you’re using the outside of your censer may get very hot.
3. Always keep incense burner in a safe stable area. Keep in mind to always keep curtains and loose article away from your burner.
4. Those with respiratory issues such asthma should take precaution and always burn in a ventilated area.
5. Make sure all your spent incense materials are completely extinguished and cold to the touch, before discarding (i.e. incense, matches, ash, charcoal). Charcoal ash can remain hot for hours after your incense has burned out. Hot incense material can ignite in a wastebasket.
For more Incense Burning safety tips go here.
The Tools
Charcoal- Since I will be burning loose incense I will be using charcoal. These are rather inexpensive and I usually buy them off a street vendor. However there are a few places where you can check online and they average about $3-5 depending on vendor you purchase from.
Kitchen tweezers– Once the charcoal is lit you DO NOT want to ever touch the charcoal. Anytime you want to manipulate the charcoal make sure you have your tweezers.
I usually light it here then transfer it to my Can.
Lighter: This type of lighter comes in very handy. You will need something to light your charcoal up which takes a couple of seconds depending on your charcoal. A regular cigarette lighter may work but I find that it’s not resistant enough because you need consistent heat to ignite the charcoal. I find that this lighter is best. $1 at my local dollar store.
It takes several seconds for the charcoal to ignite. Once the charcoal is lit you will see it lightly sprarkle throughout the block.
This lighter keeps my hands and nails safe. I prefer to let my cahrcoal sit on the HEAT PROOF censer then light it. Since charcoal is made of potassium nitrate once you hear it sparkle or sizzle you know it’s already lit. Make sure it’s ignited completely by observing the sparkles.
Censer: Charcoal can burn up to 1,000 degress or more so it’s important you find a censer for burning incense or a heat resistant container where you will place your charcoal. The Censer is what holds the charcoal in place. There’s a wide variety of different types of censers, you just have to shop around and see which one works best for you.
 |
| Screened Censer |
 |
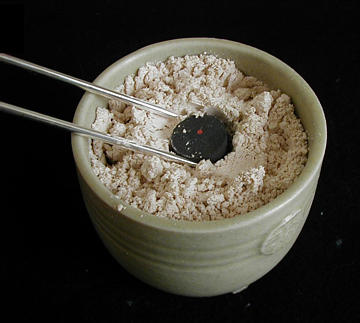
| Charcoal with Ash |
When I first started, I used a regular can with a plate on the bottom for support. Check this link out to give you a better idea of all the different types of burners available.
Since I prefer homemade things before I invest in anything, I went ahead and got an empty can.
Since the can is not Heat Resistant and can burn to the touch…..
I placed two heat-oven, microwave proof coffee plates underneath…..
It’s just a regular old empty bean can I cleaned out.
With my kitchen tweezers, I carefully placed the lit charcoal block in the can with the heat resistant plates on the bottom.
Once it’s in the can you can sprinkle you loose incense of choice.
And you are pretty much ready to spread your incense smoke around.
So that’s basically it very simple and effective. Once you start familiarizing yourself with this type of incense you will find that’s it’s very easy and versatile to use. Again this is a great way for you to promote peace in your home as well as purify your space of any negative vibrations.

 Hell Notes for Beauty™ is the premiere metaphysical destination for the strong willed, inspired and determined soul. I am dedicated to the solitary practitioner seeking to establish spiritual independence, self care and recognition of ancestral knowledge.